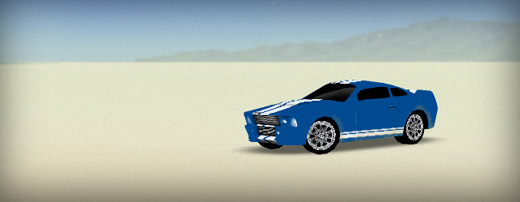
Car simulation with Maya & Papervision3d

Take a test drive with a powerful Mustang GT in a desert scenery! This demo features a car model imported from Maya into Papervision3D.
It uses some home-made physics to simulate the car movement and a couple of new AS3Dmod features to manage the model (more below).
I created this demo together with Krister Karlsson. Krister is a 3d artist working with Maya and founder of Modesty – a Stockholm based creative agency. The (super)low poly Mustang used here is based on a concept model made by Krister that was later used to create an actual car! You can read more about this project here.
Working with this demo has been an occasion for me to explore all the spectrum of Flash 3D related development, like importing and managing a complex model, adding interaction and scripting car physics. All this with a reasonable performance in mind, of course.
There is quite a lot of source code involved in this demo. I won't be publishing it all as parts of it are rather messy. Instead I'll focus on some particular problems I've encountered and solutions to them.
Pivots
I can't tell if this is a problem of the Maya Collada Exporter or if we have been doing something wrong, but the fact remains that moving the pivot point of an object in Maya is not reflected in Papervision3D. Instead, all pivot points default to the center of the whole object when the DAE file is imported.
To fix it, I had the idea to move the pivot point in Actionscript. Unfortunately, there isn't an easy way to do that in Papervision3D. This problem is generally solved by putting the DisplayObject3D inside another and move it in relation to its parent. But when all the objects are part of a structured DAE it becomes quite painful and requires additional steps. So instead, I wrote a modifier that takes care of that. It's called Pivot, and this is the way it works:
var do3d:Cube = new Cube(materials, 200, 200, 200);
var stack:ModifierStack = new ModifierStack(new LibraryPv3d(), do3d);
var pivot:Pivot = new Pivot(-200,-200,-200);
stack.addModifier(pivot);
stack.collapse();
This piece of code will move the pivot point -200 units on all 3 axes. In case of this cube it will end up in the lower left corner. It does it without creating any additional display objects, but rather by offsetting all the objects vertices.
Please note that I collapse the stack after applying the pivot. Otherwise the pivot would be moved at every call to stack.apply(), which is not what we are looking here for.
The problem with the Mustang model was that all 4 wheels were rotating around the center of the car rather then around individual centers of each object. I needed to move the pivot point to the center of each wheel. I thought that moving the pivot to the geometrical center of the object is a typical thing to do, so I create a shortcut method for it:
pivot.setMeshCenter();
Calling this function automatically sets the pivot point in the geometrical center of the mesh. At this point I thought I was done with the wheels, but there was one more problem…
Roll & steer
I think anyone who ever created an interactive 3d car model must have faced this one. A wheel rolls around the Z axis and the steering goes along it's Y axis. So, the first think that came to my mind when I started to code it was:
wheel.rotationZ += 10; // roll 10 degrees
wheel.rotationY = 30; // turn 30 degrees
While this code seems perfectly logical, when put in action things go wrong and the wheel starts to act like if the car had undergone a severe crash.
The reason for this is that once the wheel rotates along the Y axis (turns), the Z axis is no longer the right axis for roll. The correct axis would be the Z axis rotated 30 degrees on the XZ plane.
Again, a solution would be to enclose the wheel into a parent DisplayObject3D and then use the parent to steer and the child to roll. However, since I had already an elegant solution for the pivot I didn't want to clutter my model with an additional set of elements for this one either.
There comes the Wheel modifier. Apply it to an object – typically of a cylindrical shape – and use its speed and turn properties to manipulate the wheel.
var do3d:DisplayObject3D = dae.getChildByName("wheel", true);
var stack:ModifierStack = new ModifierStack(new LibraryPv3d(), do3d);
var wheel:Wheel = new Wheel();
stack.addModifier(wheel);
...
// Please mind that it expects values in radians
wheel.turn = Math.PI / 6;
wheel.speed = 5;
stack.apply();
Internally the modifier applies some math to rotate the roll axis according the the current turn value so that everything looks fine and you don't need to worry about it ;) Read the documentation of this class for more information.
All this new features are available in the latest SVN revision of AS3Dmod. So, go ahead and grab it later. But first, enjoy your ride!
