Tutorial: Create a reflection effect with Flash/AS3

I got some feedback about the sound equalizer that I posted a few days ago, and especially about the reflection effect I used in there.
I thought that maybe it was a good idea to write a tutorial about how to make these kind of reflection using AS3. It is a pretty straightforward technique, but it involves some bitmap manipulation, matrix transformations and color and alpha channel editing – three very interesting features of Actionscript.
It's my first tutorial ever and I must say it is hard to write one, much harder than I expected. Nevertheless, it is now here. The funny part of the story is that while I was writing it I actually came up with some improvements and tweaks on how to make those reflections, so I can honestly say I've learned some new stuff on the way. Take a look and tell me what you think!
Reflection Effect Tutorial
0. Introduction
Since the introduction of the BitmapData class in Flash 8 it became possible to manipulate bitmaps on a pixel level using Actionscript. Combined with some basic matrix transformations and bitwise operations on color values - both very useful in everyday actionscripting - the BitmapData class constitutes a powerful tool. This tutorial is a demonstration of some of the possibilities it offers. I will guide you through all the steps from creating the FLA file on, but you can download all the files here (177KB).
1. Setting up the workspace
In the tutorial we will create a reflection of a picture. So browse your hard disk, get a nice photo of you and your girlfriend on the last year trip to Paris, or maybe a picture of your hamster or anything else you like. Open it in your favorite image editor a resize/crop it to the size 300x200 pixels. Once you are done, export it as a JPG file with high quality settings.
Open your Flash IDE, set the size of the document to 500x500 and the background color to pitch black (#000000). Use Ctrl+R or 'File > Import' to import the picture and put it into your library. Be sure to remove it from the stage if Flash did put it there too during import.
Create a new MovieClip, give it a name and assign a class to it named 'Picture'. The base class should be 'flash.display.Sprite'. You will have to change it manually, as Flash puts there a 'flash.display.MovieClip' by default. It should look like this:
In the newly created Picture clip put your picture at coordinates x:0 y:0. It is very important that the picture has it's top left corner exactly where the clips registration point is located.
2. Creating a document class
Time has come to start coding. Open your favorite AS3 editor, create a class named 'ReflectionTutorial' and save it in the same directory as your FLA file as 'ReflectionTutorial.as'. This is going to be our document class, so add it in the properties panel in the Flash IDE, like this:
Now you can start editing the 'ReflectionTutorial.as' file. Start by putting a stub, like this:
package  {
    import flash.display.Bitmap;
    import flash.display.BitmapData;
    import flash.display.Sprite;
    import flash.geom.Matrix;
    import flash.geom.Point;
    import flash.filters.BlurFilter;
    public class ReflectionTutorial extends Sprite {
        public function ReflectionTutorial() {
        }
    }
}
Here we declare the default package and import all the classes that will be necessary for our work (that way, we won't need to worry about that later). We also declare the class as a subclass of Sprite and add an constructor method. I assume that you have a basic understanding of OOP (Object Oriented Programming) in Actionscript 3 so I won't go into details about this part of the code. Try to compile your FLA now. You won't see anything but it should compile without any errors and warnings. Once you have checked this, we can move on.
3. Adding the picture to the display list
Now that all the basic setup is done, we can add our picture to the display list so we can actually see it. As the reflection will be placed below the picture, we will place it in the upper part of the stage. First you must declare a variable that will hold our picture, and then instantiate it and add to the display list. Variables are declared directly after the declaration of the class. The code to put our picture on stage will go inside the constructor. It should look like this:
public class ReflectionTutorial extends Sprite {
    private var picture:Sprite;
    public function ReflectionTutorial() {
        picture = new Picture();
        picture.x = 110;
        picture.y = 15;
        addChild(picture);
    }
}
We create a new Picture instance. A Picture is our picture clip from the FLA file, just as we declared it at the beginning. The new instance of Picture is assigned to a variable of type Sprite. We can do this because Picture extends the class Sprite. We assign x and y positions to it and we add it to the display list. Unlike in AS2, in AS3 anything that we want to see on the stage must be explicitly added to the display list using the addChild() method, so this line is very important. No, you can compile your FLA. You should see the picture located in the top-middle part of the stage. The area below is where the reflection will go.
4. Adding a new function
Her starts the fun part. We we are going to do is:
- Copy the image of the picture into a BitmapData object
- Add this object to the display list correctly positioned under the picture
- Flip it vertically
- Add some alpha fade out
- Add some effects
To organize our code a little bit we will put all the code responsible for creating the reflection in a separate function, that we will invoke from the constructor. Here's how it should look:
public function ReflectionTutorial() {
    picture = new Picture();
    picture.x = 110;
    picture.y = 15;
    addChild(picture);
    createReflection();
}
private function createReflection():void {
// Here goes the code
}
From now on all the code we will be adding will go into this function.
5. Basic reflection
Before we start to copy the picture to create it's reflection, we need to declare some more class variables. To the picture of type Sprite we will add two new:
public class ReflectionTutorial extends Sprite {
    private var picture:Sprite;
    private var reflection:BitmapData;
    private var reflectionHolder:Bitmap;
The reflection BitmapData is our canvas on which we will paint the reflected image. But what is the 'reflectionHolder' Bitmap? Well, we need this because a BitmapData does not extend DisplayObject, which means it cannot be added to the display list. So to see a BitmapData on the stage we need to wrap it into a special class designed especially for this purpose, and this is exactly the Bitmap class. So let's create the reflection (finally)! To the createReflection function add the following code:
private function createReflection():void {
    reflection = new BitmapData(
    picture.width, picture.height, true, 0x00ffffff);
    reflection.draw(picture);
    reflectionHolder = new Bitmap(reflection);
    reflectionHolder.y = picture.y + picture.height;
    reflectionHolder.x = picture.x;
    addChild(reflectionHolder);
}
A lot is going on here! Let's take it line by line. In the first line we create our BitmapData object, and we give it the same size - width & height - as our picture has. We are also declaring that it will support transparency (3rd argument - "true") and paint it all in fully transparent white color (last argument). Next we use the method draw of the BitmapData object to copy our picture to it. After that the reflection will hold an image of our picture copied pixel by pixel.
Next we need to add it to the display list so we can see it on the stage. As I mentioned above, we have to use the Bitmap class here. Its constructor takes a BitmapData as argument, so we pass our reflection BitmapData in there. Next we have to position the reflection correctly under the original picture. So they will share the same x coordinate, and the reflection will be positioned just under it (y = picture.y + picture.height). Finally, in the list line we add the reflection holder to the display list, just the same way as we did with the original picture.
If you compile the FLA now you should see another picture just under the original one. We copied the original and positioned correctly, but it does not look like a reflection, does it? It doesn't, because we need to flip it first.
6. Flipping the reflection
Unfortunately, even though the Flash IDE has a "Flip vertical" option in the menu, in AS3 there is no such command, so we need to use a combination of a few other methods to achieve the desired effect. Go to the createReflection method and add the following code:
private function createReflection():void {
    reflection = new BitmapData(
    picture.width, picture.height, true, 0x00ffffff);
    var flipMatrix:Matrix = new Matrix();
    flipMatrix.rotate(Math.PI);
    flipMatrix.scale( -1, -1 );
    flipMatrix.translate(0, picture.height);
    reflection.draw(picture, flipMatrix);
    reflectionHolder = new Bitmap(reflection);
    reflectionHolder.y = picture.y + picture.height;
    reflectionHolder.x = picture.x;
    addChild(reflectionHolder);
}
Note that the reflection.draw method call has been modified, and takes two arguments now. The first one is the sprite containing the original picture. The second one is a transformation matrix that we declare above. Let's take a closer look on that one.
To flip the reflection bitmap we are using a matrix. A matrix is basically a one or two dimensional Array. This particular flash.geom.Matrix class is 3 x 3 matrix. Those 9 values are used to store information about the transformations applied to a Sprite. Those transformations include scaling, rotating, moving and skewing the Sprite. Some of those values can be set manually, but fortunately Adobe provided us with some very handy methods to manipulate them.
To flip the image we are first rotating it by 180 degrees. This is what the rotate method does. But be careful, because it takes as argument a value expressed in radians not in degrees, so we can't just put "180" in there, we need to put Math.PI, which is 180 degrees in radians. The general formula to transform degrees into radians is: rad = deg Math.PI / 180. So 180 Math.PI / 180 gives us exactly Math.PI.
A rotated image is not a reflection yet. What we need to do is to flip it, that is move all the pixels from the left to the right and vice versa. This is what we use scale for. It might sound a little bit tricky, since we do not change the size (scale) the image. But by passing -1 as argument, we achieve exactly what we want - we flip our image around the vertical axis. The second argument equals to 1, which means "do not scale". It is ok - we do not want to flip it around the horizontal axis.
Finally we need to translate our reflection ('translate' is just a wise word for 'move'). Now you might think: "Rotating? I get it! Flipping? ok! But why do I have to move the picture?". This is because our initial picture has its registration point in the top left corner. If you would set it in the middle of the Sprite you wouldn't have to do this, but since most of the time it is better to have the registration point in the top left corner, here we do it like this. Here's a simple chart that shows all the three transformations we apply:
I hope the chart clarified things a bit. The important thing is that at the end we have our picture flipped a back in the same place. We need now to add the matrix to the draw() method, so that when the original picture will be copied into the reflection those transformations will be applied on the way...
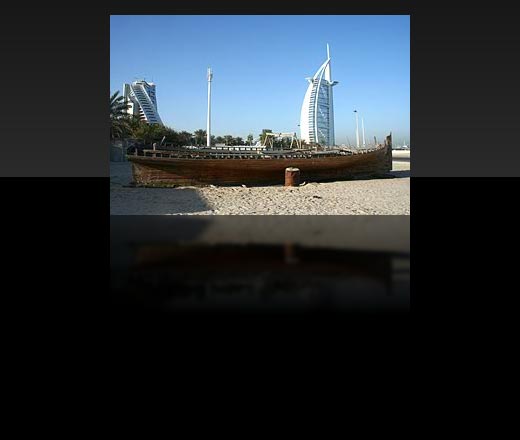
Ok, let's leave the Matrix before agent Smith comes in. You can export the FLA now, and you should see a reflected image underneath the original. Something like this:
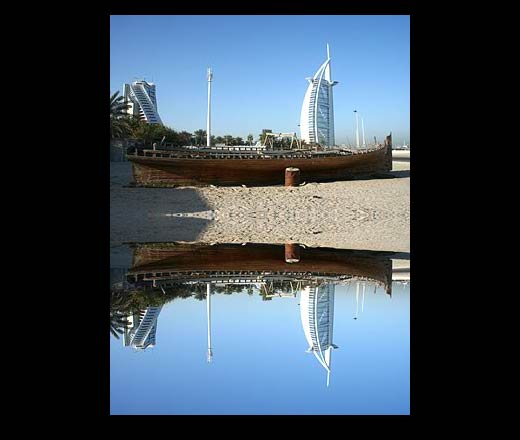
7. Applying alpha fade out
Our reflection might look correctly but it does not look good yet. It does not look natural, because the reflection has the same alpha everywhere, while a real reflection would tend to disappear the further it goes from the original image. To achieve this effect we will get down to the pixel level of our reflected bitmap and do some magic.
The BitmapData class has two interesting methods that we will use: getPixel32(x, y) and setPixel32(x, y, color). The first one returns the color value in the ARGB format for pixel at the x,y coordinates of the bitmap. The second method, as you might have guessed, does the opposite. The ARGB format stand for Alpha-Red-Green-Blue and is a 32 bit value, with 8 bit of information for each component.
What we will do now, is to traverse the reflection bitmap row by row and apply a new alpha (A) value for each pixel in each row while conserving its color components (RGB). To do this we need to get our hands dirty and perform some low level operations on bytes. If you are not experienced in this area, don't worry, it will be just 3 lines of code...
Now, go ahead and after the line reflection.draw() call add the following code:
reflection.draw(picture, flipMatrix);
for (var i:int = 0; i < picture.height; i++) {
	var rowFactor:Number = 1 - (i / picture.height);
	trace(rowFactor);
}
When you compile the FLA file now you will see a lot of values being traced. It will start with 1 and at the end will have a value very close to 0. These are the values by which we will multiply the alpha value of each pixel in each row of the bitmap. I subtract (i / picture.height) from 1 because I need them inverted - the closer we are to the top of the reflected picture (i.e. closer to the original picture) the closer ro 1 the alpha multiplier value should be.
When you've seen all the traced values, you can remove the line with the trace() command and replace it with some new code:
reflection.lock();
for (var i:int = 0; i < picture.height; i++) {
	var rowFactor:Number = 1 - (i / picture.height);
	for (var j:int = 0; j < picture.width; j++) {
		var pixelColor:uint = reflection.getPixel32(j, i);
		var pixelAlpha:uint = pixelColor >>> 24;
		var pixelRGB:uint = pixelColor & 0xffffff;
		var resultAlpha:uint = pixelAlpha * rowFactor;
		reflection.setPixel32(j, i, resultAlpha << 24 | pixelRGB);
	}
}
reflection.unlock();
First of all you need now to lock the bitmap before proceeding to the transformation. It is a small performance trick, which will stop internal AS3 functions to update the display of the bitmap until all the transformations are done. Obviously, after locking the bitmap, it needs to be unlocked - that is what the last line does.
Now you have two nested for loops - the outer one traverses the bitmap row by row, and the inner one - pixel by pixel in each row. We can calculate the rowFactor in the outer loop, because the same value will be applied to each pixel in a row. Inside the inner loop comes the actual pixel manipulation. What is exactly going on in there?
First we use getPixel32() to get the ARGB value of the pixel at the position where we currently are. So far so good...
In the second line we extracting the alpha component value from the ARGB color definition. For this we use a bitwise unsigned right shift operator. Explaining in details how it works and what it does is beyond the scope of this tutorial, and if you really need to know more refer to the AS3 docs and read this. For the moment all we need to know is that the pixelAlpha variable will now hold the alpha value (A) for our pixel extracted this way from the ARGB code.
The next line features again one of those terrible bitwise operators, this one is called bitwise AND. All we need to know here is that it chops the Alpha channel information from the ARGB color definition - and thus we and up with just RGB. This way we split the color to two variables: 'pixelAlpha' that holds A (Alpha) and the 'pixelRGB:uint' that holds the RGB (Red-Green-Blue) values.
Now it is time for the rowFactor multiplier. We multiply the 'pixelAlpha' value by the 'rowFactor' for the current row. After that we put back the ARGB color value together, using the new alpha value ('resultAlpha') and the RGB value that we extracted just before. That is what happens in the line with the call to the setPixel32() method. You can see two other bitwise operators: the '<<', called bitwise left shift and the '|' AKA bitwise OR. And this operation is performed for each pixel of the image. So with our picture being 300x200 pixels, there are 60000 pixels to traverse and modify. Yet, thanks to the usage of low level bitwise operations you will be surprised how fast it is.
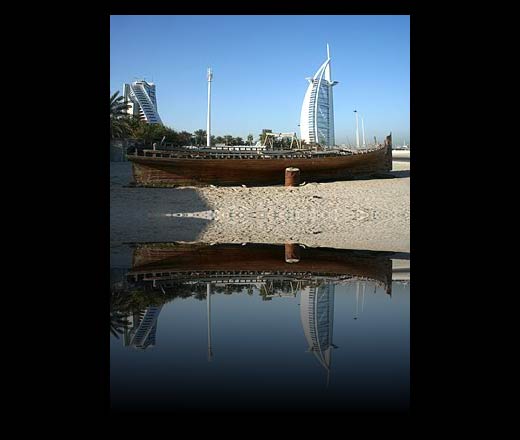
Compile the FLA and see it for yourself - the reflection should be there and it will now gently fade out the further it gets from the original picture. It should look something like this:
8. Tweaking and adding effects
Now our reflection looks pretty decent, but we can still tweak it a little bit more. Let's add some blur first. After the for loops add the following line:
reflection.applyFilter(reflection,
    reflection.rect,
    new Point(0, 0),
    new BlurFilter(4, 4, 3));
The applyFilter() allows to apply filters like Blur, Dropshadow, DisplacementMap and others. This method is very handy but has a little bit cumbersome list of arguments. Let me explain a little bit what is going here.
First of all the basic philosophy of the applyFilter() method is that we do not apply the effect to the reflection bitmap, but rather overwrite it with another bitmap - the bitmap that is passed as the first argument here. It is like saying: take this bitmap, apply the effect to it and paint the result back on the object that invokes the method.
The other two arguments are only a logical consequence of this approach. Since we paint on the bitmap we must define which area we are painting on. We want to paint all over it so we just take the rectangle that is now occupied by the reflection bitmap i.e. the entire surface of the bitmap. We must also say where to start - we will start at the top left corner that is as 0,0, which combined with the rectangle will allow us to apply the filtered bitmap to the whole reflection bitmapData.
NOTE. There is another way to apply a blur filter here. Remove the line above ad put another one like this:
reflectionHolder.filters = [new BlurFilter(4, 4, 3)];
Insert it just below the lines where x and y properties for the reflectionHolder are set. Export the FLA and try to see the difference. The difference is that this way the bitmap is blurred also on the edges, while the applyFilter() method blurred the inside picture but kept the edges sharp. Personally, I prefer the other method, but they are both valid and in some situations this one may give a better effect.
There is one last tweak we can do. I think that only a part of the picture should be visible in the reflection and it should fade out quicker, and also that it is a little bit too bright. One small modification will fix all those problems. In the for loop, where the rowFactor value is calculated, change the line to this:
var rowFactor:Number =
Math.max(0, 0.5 - (i / picture.height));
Now the reflection will more transparent and shorter, because we introduced an offset to the alpha value at each row. Now it starts with 0.5 instead of 1 and gets to 0 around the middle of the reflections height. Thanks to the very useful Math.max() method it will then stay at 0 until the last row. Math.max() take two numbers as arguments and simply returns the one that is larger. When you have edited the line, you can now export the FLA and see the final effect.
9. That's all folks!
Voilà! You've made it.
What you can do now is to modify the code a little bit, so that the createReflection() method is added to the ENTER_FRAME event listener. This way the reflection will change dynamically with its original object (this is a way to create reflections on animated clips or even video). Experiment a little bit with different all settings. Remember that you can download all the files here (177KB).
I hope you enjoyed the tutorial, and be sure to check my blog, where I put a post with some examples. Thanks!